Tech: WeatherTech Jeep JK Install

Tech: WeatherTech Jeep JK Install

As everyone who lives in Canada knows, it is next-to-impossible to keep the inside of your vehicle clean during these Late Fall/Winter months as we are constantly tracking in dirt and debris caused by the rain and snow. For the most part, OEM interior floor liners and mats are somewhat lacking and don’t give you the kind of coverage you’d hope for, as we found with our current 2-door 2017 Jeep Wrangler JK project vehicle. Although the existing mats did provide some coverage, we figured there had to be a better way, so we reached out to our friends at WeatherTech to see if they could provide some assistance.

Luckily for us, WeatherTech was more than happy to oblige and sent us over a set of their FloorLiners for the front passenger area and a Cargo Liner for the rear cargo and passenger areas. These liners are all digitally laser-fit in order to provide a consistently perfect fit, provide you with much more coverage than our stock floor mats, and are easy to remove and either spray or wipe down in order to clean. The rear Cargo Liner also provided a perfect fit and was installed with our rear seat out to provide coverage for the entire rear area, but provided pre-cut holes which allowed us to re-install the seats over top. This is just one of many options offered by WeatherTech for our Jeep, as we also had the option of having a smaller liner install directly behind the seats and another option for second-row liners.

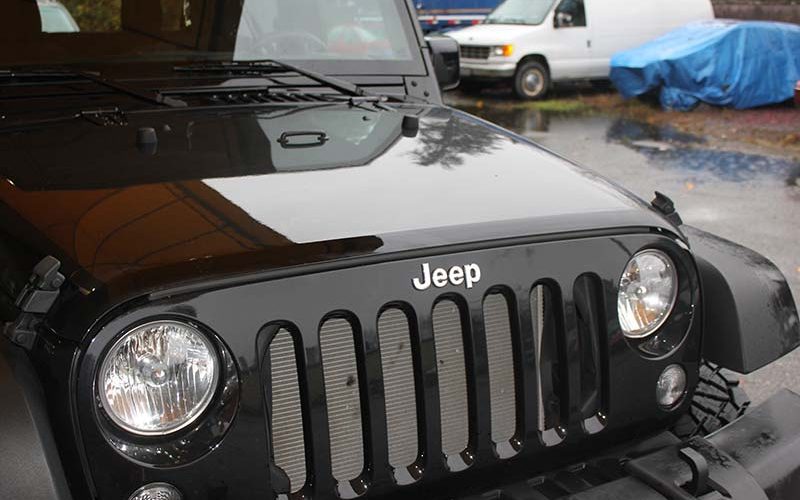
On top of all of that, WeatherTech was generous enough to also supply us with a Hood Protector and Side Window Deflectors, which will give us even more protection and versatility. The Hood Protector features a streamlined look that integrated perfectly into our front end and provides an additional barrier against bugs and debris to maintain our Jeep’s finish. The Side Window Deflectors will allow fresh air to enter and leave the vehicle, while protecting us from the elements at the same time. Both products are made from a durable, yet flexible acrylic, and are sure to provide us with years and years of protection.

Once the products were all received, we moved on to the installation process which, thankfully, was a very simple one, and in no time we were ready to take on the elements. Big thanks again to the guys down at WeatherTech for providing us with the products.

Our WeatherTech Floor Liners, Side Window Deflectors and Hood Protector all laid out and ready to go. The only product you don’t see here is the Cargo Liner which we will get to later.

As you can see, our stock floor mats provide only adequate protection and will easily become soaked during some harsh winter conditions.

After removing the stock mats, our new WeatherTech FloorLiner easily went into place and fit perfectly. It became immediately clear that these would provide more protection for our vehicle’s interior carpet and would be much easier to clean.

We repeated the process on the other side, and moved on to the rear Cargo Liner.

We began by removing the Jeep’s rear seat as the new liner would provide protection to the entire area, and left pre-cut holes to re-install the seat once the liner was in place.

Once again, the liner fit perfectly and will provide us with protection for our rear interior carpet which was previously left unguarded.

The rear seat re-installed easily thanks to the pre-cut holes, and left plenty of liner behind them in order to protect the remaining cargo area.

Next it was on to the Side Window Deflectors. First step was to clean the windows and surrounding area and lower the window down half way.

Slide the deflector forward into the window channel and make sure that the edge rests on top of the outer window sill and not down inside the channel.

Next, bow the deflector outward and insert the rear edge while leaving roughly a ¼-in. to ½-in. gap at the top. It may feel like the deflector is going to snap in your hands, but you must put some serious pressure on it in order to make it fit. The acrylic material is very flexible and will not snap during installation.

Now pull down on the deflector and tuck what’s left outside into the upper window channel, working from the front to the back. Now carefully pull down on the deflector and then roll the windows up in small increments very carefully and slowly.

You will have to put some effort into rolling the windows up initially (if they are manual, as ours are), but once you go through it a couple of times, it becomes effortless once again. We repeated the process on the passenger’s side and were ready to move on to the hood.

To begin, wipe down and dry the front edge of the hood with a cloth, and then give it another wipe down with the supplied alcohol pads. As you can see even from this picture, the top of the hood already has a few scratches and dings from just regular road debris.

Once cleaned, expose 2-in. of the tape liner from each section of the Hood Protector. This will allow you to access the free ends once you go to install. Line up the protector and once you’re happy with the alignment, begin on the driver side on top and slowly pull the tape gently in 6-in. sections. While doing so, apply even pressure to the hood with your hand. Repeat the process for the remaining sections and you are good to go.

Big thanks again to the team down at WeatherTech for supplying us with these wonderful products.

Categories: Off-Road Plus, Tech